Showing posts with label stitching retreats. Show all posts

Wednesday, January 29, 2014

Final bits and pieces from my retreat

Today I'll show you the final bits and pieces that I finished during my stitching retreat. I did a lot and will be in good shape for birthdays this spring and summer all the way through Christmas!

First are the wine-themed towels that I started early because I was so excited about the retreat. I finished three of them for my sister. Here they all are! You likely recognize the one in the middle already.

Second, and finally, I stitched this wonderful design from the Etsy shop Wellington House Design. This will be a perfect pillow for my brother-in-law who loves to winter hike in the Adirondack Mountains of northern New York. I hope to finish a companion piece of a bear in the woods for him for Christmas as well.

So that's it. My retreat is well and truly over and I am fully back into my 40-hour work week. Even so, I have several more projects prepped and ready to go, so even if I don't finish them all in a weekend, I know I will finish them as time permits.


Sunday, January 26, 2014

Retreat purses

During my stitching retreat last weekend. I started two purses--not something I intended to do, but I was inspired. I finished them this weekend. One is for me and the other for my soon-to-be step-daughter-in law. I used my old favorite book Making Vintage Bags for the patterns, which I reviewed here, and am, as usual when I use patterns from this book, extremely happy with the results!

The maroon one is for me. I use a bracelet I've had since I was in high school for the handle!
The pattern called for a ribbon rose as decoration. I substituted it with a shiny bobble and some wired ribbon accents.
I may embellish my purse a little more, but I need to think about what else I may want to add.


Wednesday, January 22, 2014

Embroidered portraits

One of the things I wanted to do during my stitching retreat last weekend was to try embroidered portraits. I had seen them on Pintrest and traced the photo back to the original tutorial on the Habit of Art blog. It seemed easy enough to enlarge a photo, trace it and embroider it. It was a little more difficult than it seemed though!


I don't really draw, although the one drawing class I took a few years ago really helped me understand some of the principles behind drawing and gave me confidence. Still, tracing photos is much harder than I hoped it would be. I started with two photos of my nephew, Simon, and two photos of my husband's grandson, Dracen. The plan was to make two embroidered portraits of each child--one for each parent. Unfortunately, of the four tracings, I made, only two looked at all like the children. One made Dracen look like a little hobbit rather than a baby. My husband, who went to art school, gave me some tips. He told me that I didn't need to trace all the lines I saw, or even close all the shapes. That helped a lot. It also helped having multiple photos, since I could hone in on what lines were character defining. For example, the line under Simon's eye appears in every photo I saw of him and made him look impish. I needed that, but I left out his cheek and the line under his other eye.
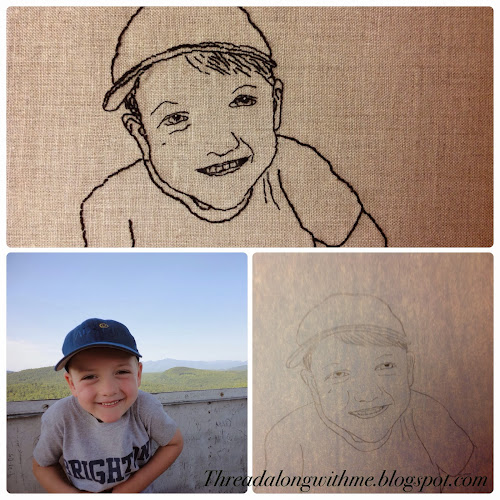
 

After tracing the photos and getting them to look how I wanted them. I was afraid to draw them into the fabric, so I photocopied them onto Stitch 'n Wash, a sticky dissolvable interfacing and basted the photos onto linen. That way I had less distortion. I had never used A dissolvable interfacing before, but I highly recommend it.


Embroidering was relatively easy. I used one strand of DMC floss for the eyes and facial features, No.12 pearl cotton for the head shapes and some details, and No. 8 pearl cotton for the clothes and some hair. It was a fun experiment.


Now all I have to do is frame the finished embroideries. I will use the same Ikea frames recommended in the tutorial, but I left enough fabric to be able to lace the portraits around a mount rather than taping them to a mat as shown in the tutorial. I'm looking forward to doing two more for the other two parents, but I will keep looking for photos that are easier to trace. Of everything I learned, the two most important tips for anyone who may want to try this technique are to have a variety of photos to choose from because some are easier to translate into line drawings than others, and to use the dissolvable interfacing. Once you get that tracing perfect, you don't want to trace it again!


Sunday, January 19, 2014

Mid-retreat check in

So my stitching "stay"treat began on Thursday, and even though I started a few things early, it has been incredibly productive so far. I've finished the set of wine-themed dish towels for my sister, a portrait of my husband's grandchild for his son, and a panel for a pillow for my brother-in-law. I also sewed a purse for our soon-to-be daughter-in-law, but I am disappointed with my sewing and will make another today. I will show you all of these things and whatever I finish on Sunday and Monday over the next weeks.


Today, I want to show you what I produced in the silk fusion class that I took at Golden Fiber Arts in Golden, Colorado on Friday. Prior to the class, I didn't even know what silk fusion was. Now I am contemplating making my experimental piece into art!

The whole piece is approximately 16" square.


For those of you who don't know what silk fusion is, I wish I had taken photos during class. It is a relatively simple process. You take dyed silk roving (it looks very much like wool roving) and gently tease out fibers to lay on a screen. I found it to be a relatively fast process to lay and gently pull the fibers out. Three to four layers are needed so that the screen is no longer visible. During the process, you must remember that the first layer or two really won't be seen, so you want to concentrate on getting your final layers looking the way you want them too. In addition to the roving, we had silk sari fibers and "hankies" available to layer on our works. The hankies are gauzy squares that are layered like filo dough. Each layer is a single silk cacoon drawn out and formed into a square. They are really lovely little things and can be layered on to cover large areas or pulled and crinkled in different ways to form shapes. The flowers on my piece are done with hankies.

You can see the rim of the hanky on the flower edge.


Once enough silk is layered, a second screen is placed on top and the whole thing is wetted and brushed until every fiber is soaked. Then a textile medium is applied to stick the fibers together before the screens are hung to dry. I let mine dry over night before peeling the screens away. The final step is to iron the piece on the silk setting to set the medium.

The silk strands leave a beautiful wavy edge and the screen provides texture to the fabric. In the lower left corner, you can see a piece of silk sari thread layered within the silk fibers.


I was thrilled with my piece when I saw it Saturday morning and am thinking of ways to embellish it. It will be a fun project and a great way to start off my resolution to learn new techniques!


One surprise was that when I walked into the class, I saw two women who I often stitch with on weekends. None of us were expecting the others to be there, which made it even more fun.


I am really happy that I decided to do this. With two more days of creativity to go, I am well on my way to having many of the birthday and Christmas presents I want to make this year done--and it is only January!


Wednesday, January 15, 2014

I got ahead of myself

Over the weekend I did cleaning and cooking, and embroidery prepping, just as I had planned to get ready for my stitching retreat. But at some point on Sunday, I started getting lazy, and with so many projects prepped to work on, I started stitching.


One of my projects is a set of kitchen towels for my sister's birthday (next November). I had three washed and had applied the iron on transfers (Aunt Martha's Wine Country set 3998). They were even colored and the crayon set. So this is what I started stitching, and I even finished one!


I'm excited to get more done over the long weekend as well as the other projects I've prepped. I have all sorts of ideas for Christmas and birthday presents this year, and if I spend the first few months of the year working on them, I should be able to get a lot done without really killing myself.

The retreat starts tomorrow, and stitching this towel has really wet my appetite!


Sunday, January 5, 2014

Planning my stitching "stay"treat

To start the new year out right, I have decided to create my own stitching retreat here at home January 16-20. I have Martin Luther King Day off so I decided to take off the Thursday and Friday before the weekend, clear my schedule and stitch for 5 days in a row. Saturday the 18th there will be open stitching at my local shop, so I can can get out and interact with other people. I have even scheduled a massage for half way through the weekend to loosen up any kinked muscles. Now for the advance planning.


I'lI need to make sure that the house is clean, cook some meals in advance and stock up on treats, movies and books on tape. I also have to decide what to work on. I've already determined that working on one thing the whole weekend is probably NOT what I want to do. Instead I want to make progress on my design for the Piecework Magazine competition, but also do a few little things that I've been thinking about for a while. Since some of them could turn into birthday or Christmas presents it would be a great start to the new year!


I'll need to prep my projects in advance to be the most productive and to be sure that I have what I need. Here are a few of the projects mulling around in my head.


  1. Kitchen towels--I have some patterns that would be perfect for my sister. I might use the color and stitch technique on them.
  2. Pillows for my brother-in-law. I just need to download the patterns
  3. Portraits done in back stitch
  4. Setting up my Brazilian sampler (but probably not working on it because I have other things I want to do before I start working on this and I know it would become an obsession).
  5. Working out details for my competition piece
  6. A pillow based on a children's book
  7. Finish an opera coat I started a few yeas ago. Actually, I'm not sure about this one. I would now feel as though it needed to be embroidered, which I wasn't originally planning on doing. BUT maybe I could plan that out.
  8. Continue work on a dragonfly embroidery I am struggling with


This is obviously too many things to work on--even for 5 days. But I have two weeks to decide and set the projects up for embroidery. I think that the projects will sort themselves out as I prepare.


I can't wait!