Sunday, February 24, 2013

Fly the friendly skies, but leave your pin cushions at home

Flying is a challenge today for so many reasons. Take your shoes off, take your coat off, place your computer and liquids in a bin--no they need to go in separate bins. And once you make it past the gate and onto the plane, the seats are crammed so close together that there is hardly room to breathe, let alone embroider.


Once, though, there was enough room to actually knit on a plane--with big metal needles. I was even allowed onto a plane a few years ago with a 24-inch circular needle on which I was trying to knit a lace shawl. I couldn't believe that they let me on since I figured a circular needle would make a pretty good garrote. But, I guess that the Department of Homeland Security isn't worried about lone garroters on airplanes when there are so many other security threats to worry about.


For example, in the security line after a recent trip home to visit my husband, my luggage was searched. I thought I would be busted for my beloved rabbit scissors, even though I knew for a fact that the blades were less than the 4"-length allowed on flights. I was prepared to fight for them.


The agent rummaging through my belongings looked nervously at his colleague and then asked me, "Do you have a piece of art in here?" "No," I replied puzzled. "It looks like a lizard," his helpful colleague chimed in. "I don't have a lizard in my suitcase," I said and glared at the backup agent. "Do you have something metal in here--like a small statue?" "No, I don't have a statue." These TSA agents had to be nuts. They moved away to confer and look at the x-ray of my luggage. "It might be a rabbit," the first agent suggested when he returned.


"Well," I hesitated, feeling a little contrite. "I do have a pin cushion in my shoe." The agents carefully took my shoes out of the suitcase. Wrapped in paper and stuffed into the toe was a brass rabbit pin cushion with a pink velvet, sawdust-filled pad that I had found at an antique mall in Pawtucket. "I knew it was a rabbit and not a lizard," the first agent said to his colleague. "I never thought of it as a statue," I stammered, feeling quite a bit nervous now. The TSA agent took a deep breathe and blew it out slowly. Then he handed me the pin cushion and told me that I could go. As they moved on to the next person in line, I heard the agents laughing nervously at whatever security threat they thought I had posed. They never mentioned the scissors.


So if you are traveling with needlework in the future, remember that small scissors and circular knitting needles are fine to bring on planes, but pincushions could be construed as a major security threat, especially if they are hidden in a spare pair of shoes.

Guess which one TSA didn't like!


Wednesday, February 20, 2013

A WELCOME update

One of my resolution projects for 2013 is to finish my Brazilian embroidery WELCOME. To encourage myself to work on it, I keep it in Massachusetts to stitch when I visit my husband. Not only do I not have to carry it back and forth, but my husband enjoys watching it come together. To see where I left off back on January 3rd, you can follow this link to my last posting.


I was back in Massachusetts February 1-18 and here is my progress. As you can see I have finished the flowers on the three letters which I had worked the greenery on in December (C, M and the final E) and stitched all of the first E. I even started the gold work on the O. Let's look more closely.


The first E is composed of a profusion of greenery done in buttonhole stitch, alternating satin stitch and detached lazy daisy stitches along stem stitch ribs. The flowers are made of bullion and cast-on stitches. Eventually, I will sew beads into the centers of the bullion "violet" and cast-on daisy and pearls onto the blue dots along the leaves. Each of the letters has a row of pearls that will fancy them up.


I have the most work left to do on the C. The daisy is made up of bullion-tipped lazy daisy stitches and filled with turkey work. Interestingly, the yellow and purple of this flower come from the same variegated thread (Iris 019) which I cut apart to use the purple and yellow sections separately. The turkey work loops will need to be cut and brushed out and then trimmed. It will make a fuzzy yellow center. The blue stamens on the "creeping flowers" look creepy to me. I don't mind the color, but the Lola thread I used is too think. One of my finishing jobs will be to find an Iris-weight substitute. I think it will look better with a lighter-weight thread and perhaps beads at the end of each stamen. The printed stars are meant to be stitched with Krenik ribbon. I have seen it done and don't like it. I think I will sew on some beads, but my bead stash is in Denver, so that will have to wait to find the right beads.


I think the M may be my favorite letter so far. I love the reds and pinks against the green and gold. The rolled rose buds turned out particularly well. The other roses are the same Bossa Nova Roses that are on the L. They consist of 13 overlapping bullions pulled tightly around each other. By pulling them in tightly, they force the first bullions upright. Each flower stands a full 1/4" above the surface of the fabric and took two full lengths of thread to complete. Although this is the most complete letter. I see some places that may need extra gold work. I have to wait until the piece is washed and the blue lines are gone to make a final determination.


The flowers on the final E are each composed of 5 overlapping cast on stitches. They will sport beaded center eventually. I did the first flower 4 times before I finally got it right. They are simple, but getting them to lay just right took a little time.


Finally, I've begun the gold work on the O, but the gold thread was shredding again, which made the stitching slow. I will need a second spool in order to finish the O and W.


While I wish I didn't have to go home yet, I have run out of 4 of the 6 threads I've been using for the greenery, so I guess I couldn't have made much more progress on this trip. I expect to finish the W and O on my trip home in April. After that, I will take the piece back to Denver to wash, prep and do the finishing work, before bringing it back to Massachusetts for framing in June.


Saturday, February 16, 2013

The projects I can't tell you about, part 2

My parent's Christmas gift this year arrived late. I finished it before Christmas, but couldn't get it framed until the end of January. Now that it has arrived in New York, I can share it with everyone.

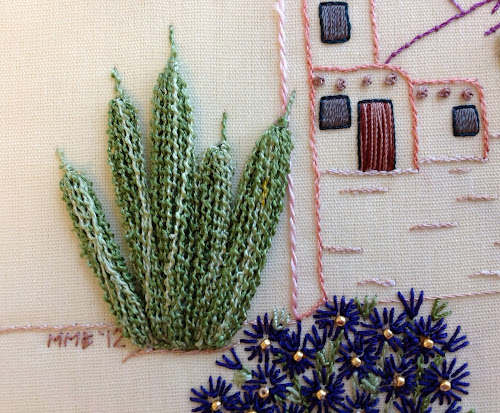
The pattern is called Santa Fe Garden by DK Designs. It is a beginner Brazilian embroidery pattern, and a good one because it uses a wide range of stitches and threads. I highly recommend it for someone trying to expand their range of embroidery techniques. Even though it is simple, it was fun to do. Let's look at some of the elements.


First, these blue and pink flowers are some of the most common and basic flower types in Brazilian embroidery. The rolled roses are composed of stacked bullions with a bullion wrapped around the bases to make the calyxes. Simple stem and lazy daisy stitches make up the greenery. The blue flowers are a little more difficult. They are composed of lapped cast-on stitches, a kind of knotted bullion. I replaced the French knots the pattern called for with aqua beads for a clean center.

These blue flowers and cactus were even easier. The flowers are just fly stitches and the cacti get their realistic shape from a very clever manipulation and piling of boucle thread. It is a very simple and fun deception.

The same is true of the trees. Boucle thread makes the French knots fuller and more leaf like. It felt like I wrapped a million French knots and was my least favorite design element to stitch, but love how it looks.

The holly hocks were probably my favorite design element. Again the choice of thread, in this case, Lola, the thickest of the smooth Brazilian embroidery threads, made this element both pretty and easy to do. The flowers are composed of detached button hole rings and French knots. So simple, but so effective.

Finally, there is the corn. I am not telling you how it was done, but it is incredibly simple and very effective. I didn't really believe it would look like corn, until I was done and then was utterly surprised at how realistic it was.

The rest of the design elements are made up of stem stitch, couching, and a little satin stitch for the adobe homes' doors and windows. It really could not be much simpler, but it is an effective design.

I saw this pattern completed by a guild member in August and decided that day that I had to embroider it for my parents, to remind them of their Santa Fe vacations. Since they just got 2 feet of snow in western New York, a little sunshine will certainly be appreciated.


Saturday, February 2, 2013

The projects I can't tell you about

One of the frustrating things about sharing my projects with the world is that I can't share the gifts I am currently stitching--even when they are big projects that take a long time to complete--because the recipient might see them.

I've got a couple of these projects underway and have spent many hours working on them this year already. Since I can't show you my progress, the next two blogs will showcase the large gifts I finished last year.

Today I will show you a wedding sampler that I made for my sister and brother-in-law's Christmas gift. Yes, they have been married 8 years, but my philosophy is that it is never too late to give a couple a wedding sampler.

This sampler was adopted from a pattern by Hillside Samplings called "Seasonal Samplings". It attracted me for two reasons. First, my brother-in-law is an active hiker who has already helped my 5-year-old nephew climb his first Adirondack high peak. I thought the pattern would appeal to him as well as to my sister. Second, it wasn't just cross stitch. There were several new stitches that I had never worked, which made me excited to stitch the pattern.

I started working the sampler last January and finished it April 1. My favorite Massachusetts needlework shop and framer, Hoops and Needles, had it framed before the end of the month, so My parents visited in the fall it was ready for them to bring home to New York and wrap for my sister. I'm told that it was greatly admired on Christmas morning.

The finished design measures approximately 6" by 15".
The strawberry blossoms were stitched with eyelet and satin stitches.
For this tree I replaced smyrna stitch accents with gold beads.
The rhodes stitch apples were particularly fun because I had never tried this stitch. I liked how it turned out.